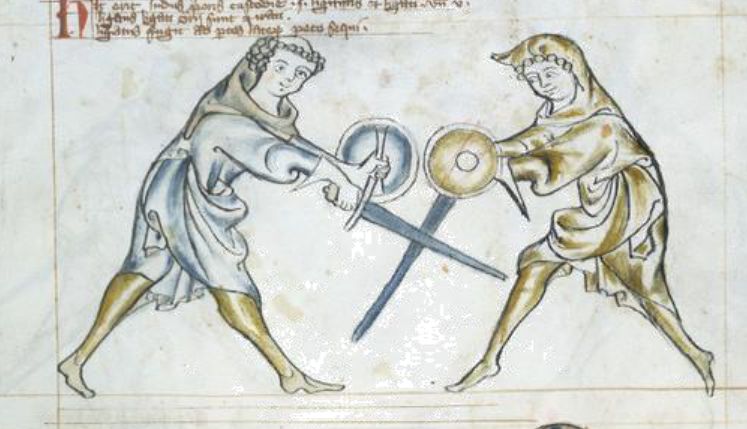
A bind in I.33 is any situaton where the two blades are in contact. It has to be two blades; contact between a blade and a shield is not considered to be a bind. Binding is always happening in the contact distance, and fight in the bind is a crucial part of second phase of attack. Generally, you don't want to be in contact distance without a bind, because this is the best way how to control the opponent's sword in this very dangerous distance.
I.33 defines 4 types of bind based on the geometry of blades. We have binding above (the opponent's sword) and on the left (side of my body), above and on the right, below and on the left and below and on the right. I.33 gives us different techniques to use in different types of bind. The "above" or "below" part is very important, because I.33 clearly favours above positions over below. While below position is sometimes neccessary, and in contact distance is better then no bind at all, it is still considered risky, because there is nothing preventing the opponent's strike to the head. The rule of I.33 is "Take the above position whenever you can. If you can't, do everything you can to change it.".
I.33 also recognizes terms the binder and the bound, which talks about the initiative. The binder is the one who has the initiative, so he can decide what will happen. The bound doesn't have initiative, so he can only react to what the binder is doing. Because of I.33's preference for the above position, the binder is usually connected with binding above, while the bound with binding below. The reason being that whoever has the initiative will use it to take the more favourable above position.
I.33 doesn't have any terminology connected to concept of being "strong" and "weak" in the bind, possibly because this would overlap with the terms "binder" and "bound". If I am the binder, then I can become strong in the bind if I want to, because I have the initiative and I can do what I want. So it doesn't matter if I am weak, but I want to do an action requiring me to be strong. I will just get the strong position and then do my action. It should also be noted that the shield can serve as a support of the sword (typically from the left side). So I may be able to push the opponent's sword even from weaker position, because I will use both weapons. On the other hand, the opponent may resist my push even if I am strong, because he would support his sword with the shield.
There is also a fifth type of bind that I.33 doesn't name, and that is something I would call a neutral bind - where our blades are crossed and no-one is clearly above and below. In I.33, this is represented by schutzen VS schutzen situation in folio [9r]. This can be considered as sort of an extension of basic set of four types, because the position in fact is not neccessary. Whoever has the initiative in this position can do a rebind, thus gaining a classical above position, from which he can fight on. But because I.33 has a few techniques launchable exactly from this situation, it is separated as something different.
Types of bind
Binding above and left
A binding situation where my sword is above the opponent's sword and on the left side of my body. The correct action from here is nucken - a false edge strike to the head, aiming between the opponent's sword and shield if possible.
Common fencers are said to also be using schutzen. That in this situation means, that they use the sword to bring the opponent's sword to the other side of the body, thus effectively switching into binding below and on the right. From here, they would probably follow up with a stichslack. I.33 doesn't recommend this action, possibly because of the switch into below position, which would leave me vulnerable against the strike to the head.
Binding above and right
A binding situation where my sword is above the opponent's sword and on the right side of my body. For binding above and right we have two possible solutions.
- Perform a useful strike between the opponent's sword and shield. This is very fast and very good solution, usable if the opponent doesn't hold his weapons together so well.
- Do a schiltslack pinning both the oponent's hands down, and then hit him with a thrust in the head. This will work well if the opponent DOES hold his weapons together, allowing me to pin both of them by one schiltslack.
Binding below and left
A binding situation where my sword is below the opponent's sword and on the left side of my body. This is a situation with most possible techniques
- Mutatio gladii. A pretty safe action that concentrates on changing a type of bind instead of hitting the opponent. This is considered to be the most safe and most catch-all option. But it also doesn't threaten the opponent.
- Durchtretten. If the opponent pushes my sword too much to the side, and I can yield under his pressure without getting hit, then durchtretten is the technique to use. It is about yielding under the pressure and returning back with a cut.
- Priest's special longpoint, arm grab. If the opponent seems vulnerable to it, it is possible to switch into prest's special lonpoint while closing into grappling distance. If successful, I can then grab the arms of the opponent and go for grappling play.
- Low hand strike
- Pull-and-push
Binding below and right
A binding situation where my sword is below the opponent's sword and on the right side of my body. This situation has two possible solutions
- Pin the opponent's arm or shield by stichslack and hit him. This is the best solution if you have been already pushed low in the bind.
- Escape the opponent's bind and thrust inside, ie. perform a stich. This is doable if you react while the opponent is still pushing your sword down. You can escape the bind safely, because the opponent is still pushing down and will continue there. It is pretty much an equivalent of cavazione.
Neutral binding
This type of bind is not named in I.33, but it is represented in the first play of schutzen, when two high schutzen clash. There are three possible solutions to this situation, and both fencers can do them.
- Perform an active durchtretten and hit the opponent in the space created.
- Go into the neutral binding with a force, beat the opponent's sword away, and then hit with cross cut from the other side.
- Go into the neutral binding with a force, beat the opponent's sword away, and then hit with a cut from the same side. Possibly low, which is hard to defend.
Binder & bound play
Binder and bound are opposed and irate; The bound flees to the side, I try to follow.
An important play that is referenced several times in the manual, because it teaches a crucial principle. When two fencers are in the bind, there is nothing forcing them to remain in it. Anyone can at any time put his sword away, thus leaving the bind. This may be considered a tactical move, because if I break the bind, the opponent can no longer feel what my blade is doing, which makes his reactions slower. But this also means that I am leaving the position in which I could feel what the opponent is doing, and this makes me vulnerable.
It should be noted, that the play of binder & bound in I.33 is always connected to binding below and on the left. It is also important to note that most of recommended solutions to binding below and on the left consist of fleeing the bind.
Leaving the bind here is not about fencer escaping out of measure just to save himself. He is leaving "to the side", so he keeps the contact distance. Also such "leaving" is not a mistake, and is is usually done as a part of some technique - for example mutatio gladii or durchtretten. And the play of binder and bound gives us a general mechanism of how to solve the situation when the opponent uses such technique.
The solution is to "try to follow". This means to follow the opponents sword by my own shield or sword (depending on which side the opponent's sword is), so that I keep my weapon close to the opponent's sword. By doing this I am taking space (so that the opponent doesn't have space to act) AND I am able to react fast because my weapon is already very close to his. This action of "following" seems to be often connected to me checking the opponent's shield from the outside by my shield, and getting to the left side of the opponent, away from his sword.
At the same time, my sword should push forward and threaten the opponent with a thrust if possible. This is important, because I don't want to just follow what the opponent does and play catch with him; this I would eventually lose. I am instead following the opponent's sword to buy myself a little bit of time in which I can strike him. So the "following" is about thrusting the opponent while keeping the control of the opponent's sword at least partially.